Spring Boot 教程:如何开发一个 starter
导语
熟悉 Spring Boot 的同学都知道,Spring Boot 提供了很多开箱即用的 starter,比如 spring-boot-starter-mail、spring-boot-starter-data-redis 等等。使用这些 starter 非常简单:引入依赖,再在配置文件中配置相关属性即可。
本教程教您如何开发一个自定义的 starter。掌握了这个技能后,您可以在工作中将通用的业务组件或中间件封装为开箱即用的 starter。
如何开发一个自定义的 starter
开发一个 starter 简单来说分为以下几步:
- 创建一个/多个自定义配置的属性配置类(
@ConfigurationProperties,可选); - 创建一个/多个自动配置类(
@Configuration); - 将自动配置类写入到 Spring Boot 的 SPI 配置文件
META-INF/spring.factories(Spring Boot 3.0+ 为META-INF/spring/org.springframework.boot.autoconfigure.AutoConfiguration.imports)。
Java SPI 机制简介
Spring Boot 的 starter 核心就是通过 SPI 机制自动装配配置类。在学习 Spring Boot 的自动装配前,我们先了解一下 Java 标准的 SPI 机制。
SPI 全称 Service Provider Interface(服务提供者接口),是 Java 提供的一套用来被第三方实现或扩展的 API,它可以用来启用框架扩展和替换组件。
SPI 的大致调用流程为:
调用方 –> 标准服务接口 –> 本地服务发现(配置文件) –> 具体实现类
因此,Java SPI 实际上是 “基于接口的编程 + 策略模式 + 配置文件” 组合实现的动态加载机制。
一个典型的 SPI 案例就是 JDBC 驱动:Java JDBC 定义接口规范(java.sql.Driver),各个数据库厂商(MySQL / Oracle / SQL Server 等)完成具体的实现,然后通过 SPI 配置文件引入具体的实现类。流程如下图所示:
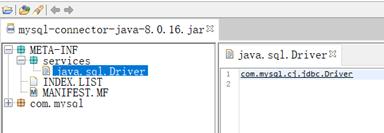
Java SPI 机制示例
一个简单的 Java SPI 开发步骤:
- 定义一个业务接口;
- 编写接口实现类;
- 创建 SPI 的配置文件,将实现类全限定名写入配置文件中;
- 通过
java.util.ServiceLoader进行动态加载与调用。
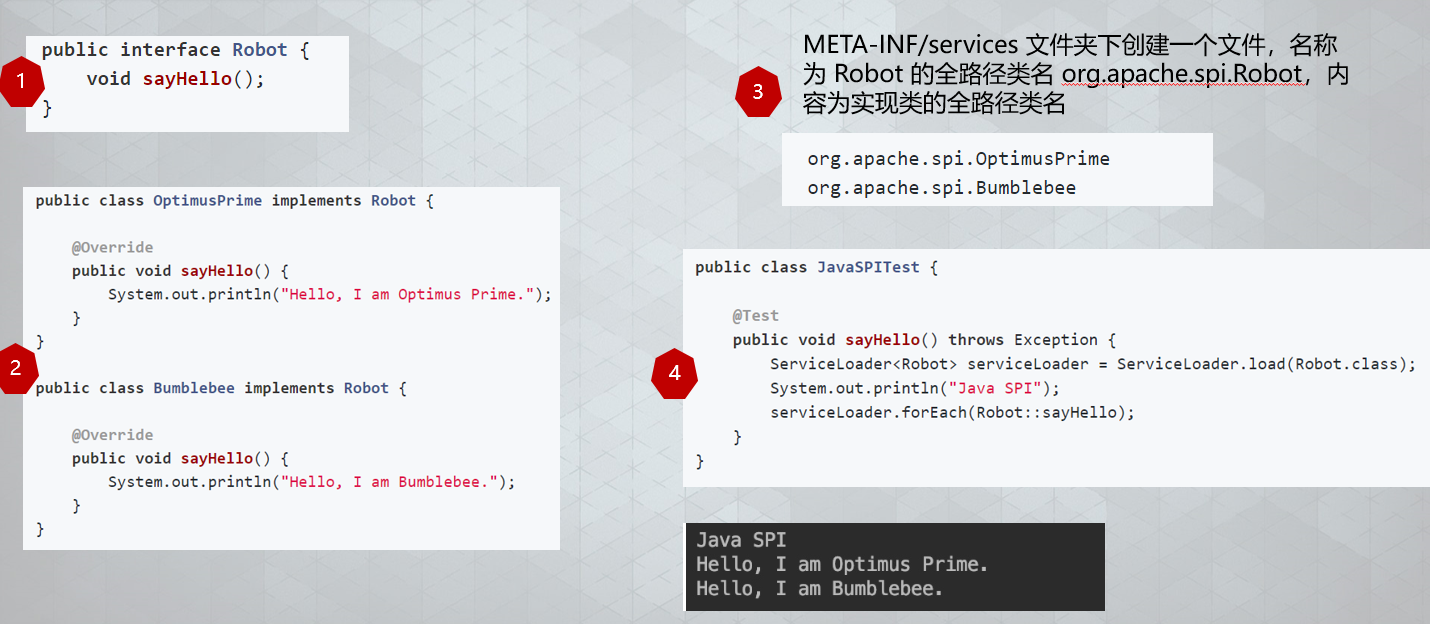
Spring Boot SPI 机制底层实现
了解了 Java 的 SPI 机制后,Spring Boot 的自动装配原理就很好理解了,整体流程类似:
读取配置文件 –> 将具体的配置类装配到 Spring Boot 的上下文环境中
Java 标准 SPI 与 Spring Boot 的 SPI 机制对比如下表所示:
| 对比维度 | Java 标准 SPI | Spring Boot SPI 机制 |
|---|---|---|
| 配置文件位置 | META-INF/services/接口全限定名 |
META-INF/spring.factories |
| 配置内容格式 | 具体的实现类全限定名列表 | Key-Value 映射(AutoConfiguration = 自动配置类列表) |
| 核心加载类 | java.util.ServiceLoader |
SpringFactoriesLoader / AutoConfigurationImportSelector |
| 条件装配支持 | 不支持(全量扫描并实例化) | 强大且高度灵活的 @ConditionalOnXXX 条件注解 |
接下来我们从源码中查找答案。
启动类上的 @SpringBootApplication 是一个组合注解,包含 @SpringBootConfiguration、@EnableAutoConfiguration 和 @ComponentScan:
@Target(ElementType.TYPE)
@Retention(RetentionPolicy.RUNTIME)
@Documented
@Inherited
@SpringBootConfiguration
@EnableAutoConfiguration
@ComponentScan(excludeFilters = {
        @Filter(type = FilterType.CUSTOM, classes = TypeExcludeFilter.class),
        @Filter(type = FilterType.CUSTOM, classes = AutoConfigurationExcludeFilter.class) })
public @interface SpringBootApplication {
    ...
}
其中 @EnableAutoConfiguration 通过 @Import(AutoConfigurationImportSelector.class) 导入 selector 来加载自动配置类:
@Target(ElementType.TYPE)
@Retention(RetentionPolicy.RUNTIME)
@Documented
@Inherited
@AutoConfigurationPackage
@Import(AutoConfigurationImportSelector.class)
public @interface EnableAutoConfiguration {
    ...
}
继续看 AutoConfigurationImportSelector.selectImports() 源码,该方法就是用来装配自动配置类的:
@Override
public String[] selectImports(AnnotationMetadata annotationMetadata) {
    if (!isEnabled(annotationMetadata)) {
        return NO_IMPORTS;
    }
    // 加载自动配置元数据配置文件
    AutoConfigurationMetadata autoConfigurationMetadata = AutoConfigurationMetadataLoader
            .loadMetadata(this.beanClassLoader);
    // 加载自动配置类,合并元数据
    AutoConfigurationEntry autoConfigurationEntry = getAutoConfigurationEntry(
            autoConfigurationMetadata, annotationMetadata);
    return StringUtils.toStringArray(autoConfigurationEntry.getConfigurations());
}
继续跟踪源码链路:
getAutoConfigurationEntry–>getCandidateConfigurations–>SpringFactoriesLoader.loadFactoryNames–>loadSpringFactories–>classLoader.getResources(FACTORIES_RESOURCE_LOCATION)
找到关键常量:
至此便清晰展示了 Spring Boot 的装配流程:在 META-INF/spring.factories 下定义的配置类会被自动读取并装配到 Spring 容器中。
实战:开发一个自定义 Email Starter
了解了自动装配机制后,我们来开发一个自定义的 Email Starter。这里对 Spring Boot 提供的 spring-boot-starter-mail 进行二次封装。
1. 创建模块并引入依赖
新建 email-spring-boot-starter 模块,在 pom.xml 中引入如下依赖:
<dependencies>
    <!-- 邮件发送支持 -->
    <dependency>
        <groupId>org.springframework.boot</groupId>
        <artifactId>spring-boot-starter-mail</artifactId>
    </dependency>
    <!-- 模板邮件 -->
    <dependency>
        <groupId>org.springframework.boot</groupId>
        <artifactId>spring-boot-starter-freemarker</artifactId>
    </dependency>
    <dependency>
        <groupId>org.springframework.boot</groupId>
        <artifactId>spring-boot-starter-web</artifactId>
        <scope>provided</scope>
    </dependency>
</dependencies>
2. 编写邮件发送模板工具类
添加开启开关 @ConditionalOnProperty:
package com.dragon.boot.mail.service;

import lombok.extern.slf4j.Slf4j;
import org.springframework.beans.factory.annotation.Autowired;
import org.springframework.beans.factory.annotation.Value;
import org.springframework.boot.autoconfigure.condition.ConditionalOnProperty;
import org.springframework.context.annotation.Configuration;
import org.springframework.mail.javamail.JavaMailSender;
import org.springframework.mail.javamail.MimeMessageHelper;
import org.springframework.ui.freemarker.FreeMarkerTemplateUtils;
import org.springframework.web.servlet.view.freemarker.FreeMarkerConfigurer;

import javax.mail.internet.MimeMessage;
import java.io.File;
import java.util.Arrays;
import java.util.List;
import java.util.Map;
import java.util.stream.Collectors;

@Slf4j
@Configuration
@ConditionalOnProperty(name = "dragon.boot.email.enable", havingValue = "true")
public class MailSenderTemplate {

    @Autowired
    private JavaMailSender mailSender;

    @Value("${spring.mail.from}")
    private String from;

    @Autowired
    private FreeMarkerConfigurer freeMarkerConfigurer;

    public Result send(String to, String content, String subject) {
        return send(MailDto.builder().to(to).content(content).subject(subject).build());
    }

    public Result send(String to, String content, String subject, String cc) {
        return send(MailDto.builder().to(to).content(content).subject(subject).cc(cc).build());
    }

    public Result sendTemplate(String to, Map<String, Object> model, String template, String subject) {
        return send(MailDto.builder().to(to).content(getTemplateStr(model, template)).subject(subject).build());
    }

    public Result sendTemplate(String to, Map<String, Object> model, String template, String subject, String cc) {
        return send(MailDto.builder().to(to).content(getTemplateStr(model, template)).subject(subject).cc(cc).build());
    }

    private String getTemplateStr(Map<String, Object> model, String template) {
        try {
            return FreeMarkerTemplateUtils.processTemplateIntoString(
                    freeMarkerConfigurer.getConfiguration().getTemplate(template), model);
        } catch (Exception e) {
            log.error("获取模板数据异常:{}", e.getMessage(), e);
        }
        return "";
    }

    public Result send(MailDto mailDto) {
        if (StringUtils.isAnyBlank(mailDto.getTo(), mailDto.getContent())) {
            return new Result(false, 1001, "接收人或邮件内容不能为空");
        }
        String[] tos = filterEmail(mailDto.getTo().split(","));
        if (tos == null) {
            log.error("邮件发送失败,接收人邮箱格式不正确:{}", mailDto.getTo());
            return new Result(false, 1002, "接收人邮箱格式不正确");
        }
        MimeMessage mimeMessage = mailSender.createMimeMessage();
        try {
            MimeMessageHelper helper = new MimeMessageHelper(mimeMessage, true);
            helper.setFrom(from);
            helper.setTo(tos);
            helper.setText(mailDto.getContent(), true);
            helper.setSubject(mailDto.getSubject());

            // 抄送
            String[] ccs = filterEmail(mailDto.getCc().split(","));
            if (ccs != null) {
                helper.setCc(ccs);
            }
            // 密送
            String[] bccs = filterEmail(mailDto.getBcc().split(","));
            if (bccs != null) {
                helper.setBcc(bccs);
            }
            // 定时发送
            if (mailDto.getSendDate() != null) {
                helper.setSentDate(mailDto.getSendDate());
            }
            // 附件
            File[] files = mailDto.getFiles();
            if (files != null && files.length > 0) {
                for (File file : files) {
                    helper.addAttachment(file.getName(), file);
                }
            }
            mailSender.send(mimeMessage);
        } catch (Exception e) {
            log.error("邮件发送异常:{}", e.getMessage(), e);
            return new Result(false, 1099, "邮件发送异常:" + e.getMessage());
        }
        return new Result();
    }

    private String[] filterEmail(String[] emails) {
        List<String> list = Arrays.asList(emails);
        if (CollectionUtil.isEmpty(list)) {
            return null;
        }
        list = list.stream().filter(this::checkEmail).collect(Collectors.toList());
        return list.toArray(new String[0]);
    }

    private boolean checkEmail(String email) {
        return ReUtil.isMatch("^[A-Za-z0-9._%+-]+@[A-Za-z0-9.-]+\.[A-Za-z]{2,}$", email);
    }
}
3. 编写 SPI 配置文件
在 src/main/resources 下新建 META-INF 目录,创建 spring.factories 文件:
org.springframework.boot.autoconfigure.EnableAutoConfiguration= com.dragon.boot.mail.service.MailSenderTemplate
4. 使用与测试
在使用该 starter 的工程中直接引入依赖,并在 application.properties 中添加对应配置即可:
# 邮件发送配置
spring.mail.host=mail.xxx.com
spring.mail.username=xx
spring.mail.password=xx
spring.mail.protocol=smtp
spring.mail.properties.mail.smtp.auth=true
spring.mail.properties.mail.smtp.port=465
spring.mail.properties.mail.smtp.from=sender@example.com
spring.mail.properties.mail.smtp.starttls.enable=true
spring.mail.properties.mail.smtp.starttls.required=true
spring.mail.properties.mail.smtp.ssl.enable=true
spring.mail.properties.mail.smtp.socketFactory.class=javax.net.ssl.SSLSocketFactory
spring.mail.properties.mail.smtp.socketFactory.fallback=false
spring.mail.default-encoding=utf-8
spring.mail.from=sender@example.com

# 附件限制
spring.mail.maxUploadSize=104857600
spring.mail.maxInMemorySize=4096

# 启用 email 模块
dragon.boot.email.enable=true
自定义 starter 的高级优化技巧
1. 配置属性自动提示
在使用官方 starter 时,IDE 输入配置项会有智能提示。要实现这个功能,只需引入 spring-boot-configuration-processor 依赖。打包时它会自动解析 @ConfigurationProperties 类生成 META-INF/spring-configuration-metadata.json:
<dependency>
    <groupId>org.springframework.boot</groupId>
    <artifactId>spring-boot-configuration-processor</artifactId>
    <optional>true</optional>
</dependency>
2. 自动配置元数据提速
引入该依赖插件还会在打包时生成 META-INF/spring-autoconfigure-metadata.properties 文件,供 AutoConfigurationImportSelector 在启动时快速过滤不满足条件的自动配置类,大幅提升应用启动速度。
总结
依托 Spring Boot 强大的自动装配(AutoConfiguration)与条件装配(@ConditionalOnXXX)能力,我们可以轻松封装出各种通用的自定义 starter,实现组件的开箱即用与解耦!